Fernando Correia’s Weblog

November 8, 2008

Exploring Pinax Series

Filed under: Software Development — Fernando Correia @ 8:26 am
Tags: ,

Pinax is an integrated collection of selected Django reusable applications. It can be used as a head start for website projects and also to experiment patterns of Django applications.

As I learn how to leverage Pinax to build Web applications, I’m writing about my experiences. I plan to update this article and to use it as an index:

  • Part 1: Installing Pinax.
  • Part 2: Creating a new tab.
  • Part 3: Creating a new application inside a Pinax website.
  • Part 4: The main domain object of the sample application.
  • Part 5: A form for submitting new items.
  • Part 6: Comments on approaches to revision control.
  • Part 7: Notifications.

The source code for the sample application is hosted on GitHub.

I also have a feed for my Pinax-related articles.

Exploring Pinax – Part 7

Filed under: Software Development — Fernando Correia @ 8:22 am
Tags: ,

I’m proceeding in my quest to learn how to create a Django application using Pinax as a base. I’m writing a sample paste bin application called Oxybeles. It’s main feature will be the ability to send pasted items to another user and to receive new pasted items as responses.

I want a user to be notified when another user sends an item or responds to one. So I went looking how the applications integrated into Pinax do that. For instance, the Inbox feature in Pinax can be used to send a message to another website user:

The Propose Swap feature of the Swaps application will also notify another user:

Those notifications can be seen in the Notices feature of the Inbox:

By inspecting the source code for these features, I found out that they use the django-notification app. There is some documentation about it on the Pinax project website. So, I started following it.

Creating notice types

Following samples and documentation, I created the file apps/oxybeles/management.py that creates notice types at syncdb time:

from django.db.models import signals, get_app
from django.utils.translation import ugettext_noop as _
from django.core.exceptions import ImproperlyConfigured

try:
    notification = get_app('notification')

    def create_notice_types(app, created_models, verbosity, **kwargs):
        notification.create_notice_type(
            "pasteditem_received",
            _("Pasted Item Received"),
            _("you have received a pasted item"))
        notification.create_notice_type(
            "pasteditem_sent",
            _("Pasted Item Sent"),
            _("you sent a pasted item"))

    signals.post_syncdb.connect(create_notice_types, sender=notification)
except ImproperlyConfigured:
    print "Skipping creation of NoticeTypes as notification app not found."

Then I ran syncdb:

$ python manage.py syncdb
Created pasteditem_received NoticeType
Created pasteditem_sent NoticeType

Notification templates

Then I created the templates that will be used to format the notifications. Each set is composed by three files: short.txt, full.txt and notice.html. For each notification type I created a directory under apps/oxybeles/templates/notification. For instance:

apps/oxybeles/templates/notification/pasteditem_received/full.txt:

{% load i18n %}{% blocktrans with pasted_item.get_absolute_url as pasted_item_url %}
{{ sender }} sent you a pasted item:

http://{{ current_site }}{{ pasted_item_url }}{% endblocktrans %}

apps/oxybeles/templates/notification/pasteditem_sent/notice.html:

{% load i18n %}
{% blocktrans with pasted_item.get_absolute_url as pasted_item_url %}
You sent a <a href="{{ pasted_item_url }}">pasted item</a> to {{ recipient }}.
{% endblocktrans %}

Sending notification

After that I should be able to notify a user when someone sends a pasted item. The first step is to add an appropriate field to the pasted item detail template:

templates/oxybeles/pasteditem_detail.html:

...
<h1>Pasted Item</h1>
<pre>
<p>{{ object.text }}</p>
</pre>
<div id="basic-form">
<fieldset>
<legend>{% trans "Send Item" %}</legend>
<form id="pastebin_send_form" method="POST" action="">
<div>{{ form.non_field_errors }}</div>
<div>{{ form.recipient.errors }}</div>
<div>Send to another user: {{ form.recipient }}</div>
<div><input type="submit" value="send" class="button" /></div>
<input type="hidden" name="action" value="send" />
<input type="hidden" name="uuid" value="{{ object.uuid }}" />
</form>
</fieldset>
</div>
...

And a form to deal with the submitted data:

In apps/oxybeles/forms.py:

...
class SendItemForm(forms.Form):
    uuid = forms.CharField(max_length=36)
    recipient = forms.CharField(max_length=30)
...

The view that shows a pasted item now will also act on this form’s data:

In apps/oxybeles/views.py:

...
def detail(request, uuid, form_class=SendItemForm, template_name='oxybeles/pasteditem_detail.html'):
    form = form_class()
    if request.method == 'POST':
        if request.POST["action"] == "send":
            form = form_class(sender=request.user, data=request.POST)
            if form.is_valid():
                form.save()
                request.user.message_set.create(
                    message=ugettext("The pasted item was sent."))
                url = form.pasted_item.get_absolute_url()
                return HttpResponseRedirect(url)
    pasted_item = get_object_or_404(PastedItem, uuid=uuid)
    return render_to_response(template_name,
                              { 'object': pasted_item, 'form': form },
                              context_instance=RequestContext(request))
detail = login_required(detail)
...

The form.save() function will notify the recipient and also the sender.

In apps/oxybeles/forms.py:

...
def save(self):
    self.pasted_item = self.cleaned_data['uuid']
    self.recipient_user = self.cleaned_data['recipient']
    if notification:
        notification.send([self.sender], "pasteditem_sent",
                            {'pasted_item': self.pasted_item,
                            'recipient': self.recipient_user,})
        notification.send([self.recipient_user], "pasteditem_received",
                            {'pasted_item': self.pasted_item,
                            'sender': self.sender,})
...

django-notification does all the work. It creates the notifications and will also mail the user if the preference is enabled. The email will only be sent when we run manage.py send_mail, though.

Now I can send a pasted item I’m seeing:
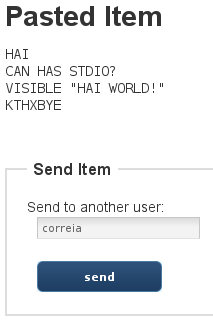
Sending a pasted item

Those sendings are recorded as notifications:

Item sent notification

And the recipient is notified when someone sends an item:

Item received notification

Pinax is an integrated collection of selected reusable Django apps, and I’m starting to learn how to leverage it. Seems pretty nice so far.

The code for this article is hosted at GitHub. Feedback is welcome.

October 30, 2008

Exploring Pinax – Part 6

Filed under: Software Development — Fernando Correia @ 7:53 pm
Tags: ,

I think this series of articles is starting to pay off… A few people are using my first article to learn how to set up a new Pinax website. And also, I am getting feedback on how to do things better.

On the pinax-users list, Bob Haugen pointed out that I was not following the recommended setup, because I was creating my new website inside Pinax’s project directory. There was no real harm, but he was right. I updated my instructions so Pinax and the custom website are in separate directories.

As I wrote on the user list:

Let me explain my motives. I use Subversion daily and I’m comfortable
with it. I knew that just copying the directory would give me lots of
trouble when I decided to update Pinax. So the “export” idea was
natural.

I just exported it alongside the sample project because I was just
starting to learn Pinax and didn’t want to mess too much with the
structure because I didn’t know about its dependencies. I had read the
customization doc, but it was not so clear to me at first sight.

But the official doc is right. I think we should consider Pinax more
like a library, like Django itself, that should be installed and
updated on its own, and the website we build should be a separate
project, with its own version control. So it should be natural to put
Pinax where we store random software (I used ~/opt) and our website
where we put things we’re working on or software we deploy (I used
~/Projects).

I’m very grateful for the feedback and I hope this humble series may be helpful.

Cheers!

October 28, 2008

Exploring Pinax – Part 5

Filed under: Software Development — Fernando Correia @ 7:50 pm
Tags: ,

Proceeding with my project to learn how to develop a Django web application over Pinax, I build two simple forms: one for submitting a new item, and another to show an item.

As one reader commented, up to this point I’m not really using any Pinax feature other than the website structure itself, like authentication, templates and menus. I’m starting with a basic Django application. I hope to add soon features like notification, messaging, tagging, gravatar.

So, in this sprint I started by defining two URLs:

  • /pastebin/ to submit a new item
  • /pastebin/<uuid>/ to view a submitted item

This is what my apps/oxybeles/urls.py file looks like:

from django.conf.urls.defaults import *
from oxybeles.models import PastedItem

info_dict = {
    'queryset': PastedItem.objects.all(),
    'slug_field': 'uuid',
}

urlpatterns = patterns('',
    url(r'^$', 'oxybeles.views.new', name='oxybeles_new'),
    url(r'^(?P<slug>[-0-9a-f]{36})/$',
        'django.views.generic.list_detail.object_detail',
        info_dict,
        'oxybeles_detail'),
)

I also updated apps/oxybeles/models.py so it knows how to build a URL for a pasted item:

def get_absolute_url(self):
    return ('oxybeles_detail', (), { 'slug': self.uuid })
get_absolute_url = models.permalink(get_absolute_url)

I wrote a simple form class in apps/oxybeles/forms.py:

from django import forms 
from django.utils.translation import ugettext_lazy as _ 

from oxybeles.models import PastedItem 

class PastedItemForm(forms.ModelForm):
    class Meta():
        model = PastedItem
        fields = ('text',)

    def __init__(self, user = None, *args, **kwargs):
        self.user = user
        super(PastedItemForm, self).__init__(*args, **kwargs)

And finally I wrote in apps/oxybeles/views.py the view function that is in charge of the form for submitting new items:

from django.shortcuts import render_to_response, get_object_or_404
from django.http import HttpResponseRedirect, get_host
from django.template import RequestContext
from django.core.urlresolvers import reverse
from django.utils.translation import ugettext, ugettext_lazy as _
from django.contrib.auth.models import User
from django.contrib.auth.decorators import login_required

from oxybeles.models import PastedItem
from oxybeles.forms import PastedItemForm

def new(request, form_class=PastedItemForm, template_name="oxybeles/new.html"):
    """
    Form for pasting new items.
    """
    form = form_class()
    if request.method == 'POST':
        if request.POST["action"] == "paste":
            form = form_class(request.user, request.POST)
            if form.is_valid():
                item = form.save(commit=False)
                item.user = request.user
                item.save()
                request.user.message_set.create(
                    message=ugettext("The new pasted item was saved."))
                    # some problem with ugettext_lazy here
                return HttpResponseRedirect(reverse('oxybeles_detail',
                                            args=(item.uuid,)))
    return render_to_response(template_name,
                              { "form": form, },
                              context_instance=RequestContext(request))
new = login_required(new)

Finally, I wrote the two templates.

templates/oxybeles/new.html:

{% extends "site_base.html" %}

{% load i18n %}

{% block head_title %}{% trans "Paste Bin" %}{% endblock %}

{% block body %}
<div id="basic-form">
<fieldset>
<legend>{% trans "New Item" %}</legend>
<form id="pastebin_new_form" method="POST" action="">
<div>{{ form.non_field_errors }}</div>
<div>{{ form.text.errors }}</div>
<div>{{ form.text }}</div>
<div><input type="hidden" name="action" value="paste" />
<input type="submit" value="paste" class="button" /></div>
</form>
</fieldset>
</div>
{% endblock %}

templates/oxybeles/pasteditem_detail.html:

{% extends "site_base.html" %}

{% load i18n %}

{% block head_title %}{% trans "Paste Bin" %}{% endblock %}

{% block body %}
<h1>Pasted Item</h1>
<pre>
<p>{{ object.text }}</p>
</pre>
{% endblock %}

And this is the final result:

http://127.0.0.1:8000/pastebin/

http://127.0.0.1:8000/pastebin/47d33482-a936-453a-8d4a-88aada4ebc44/

So, the basic app is in place. The source is in GitHub. In the next article I plan to implement a command to send a pasted item to a user, using Pinax’s features.

October 26, 2008

Exploring Pinax – Part 4

Filed under: Software Development — Fernando Correia @ 8:49 pm
Tags: ,

This is the fourth of a series of articles about my experience learning Pinax. In the previous articles I created a new option in the menu for a paste bin application and linked it to a very basic view.

My next step is to create a form for pasting text. I plan to do that using a form based on a model object. So the first thing I did was to write that model.

$ gedit apps/oxybeles/models.py
from django.contrib.auth.models import User
from django.db import models
from django.utils.translation import ugettext_lazy as _
from uuid import uuid4

class PastedItem(models.Model):
    """
    An item that was pasted.
    """

    uuid = models.CharField(_('identifier'), max_length=36, unique=True)
    text = models.TextField(_('text'))
    in_response_to = models.ForeignKey('self', related_name='responses',
        blank=True, null=True, verbose_name=_('in response to'))
    user = models.ForeignKey(User, related_name="pasted_items",
        verbose_name=_('user'))
    pasted_at = models.DateTimeField(_('pasted at'), auto_now_add=True)

    def __unicode__(self):
        return self.uuid

    def save(self):
        if not self.uuid:
            self.uuid = str(uuid4())  # random so it can't be easily guessed
        super(PastedItem, self).save()

The uuid will be used later to refer to an object in a URL. It will be a random unique identifier. The text field is what the user pasted, and is the main content of this object.

I plan to allow responses to pasted items, so that two users can share different versions of the same text. The in_response_to field will be used for that.

Since now the application has a model object, I must tell Django about it:

$ gedit settings.py

Insert the application name inside the INSTALLED_APPS list:

INSTALLED_APPS = (
...
    'oxybeles',
...
)

Then I was ready to review if the table would be created correctly:

$ python manage.py sqlall oxybeles
BEGIN;
CREATE TABLE "oxybeles_pasteditem" (
    "id" integer NOT NULL PRIMARY KEY,
    "uuid" varchar(36) NOT NULL UNIQUE,
    "text" text NOT NULL,
    "in_response_to_id" integer NULL,
    "user_id" integer NOT NULL REFERENCES "auth_user" ("id"),
    "pasted_at" datetime NOT NULL
)
;
CREATE INDEX "oxybeles_pasteditem_in_response_to_id"
ON "oxybeles_pasteditem" ("in_response_to_id");
CREATE INDEX "oxybeles_pasteditem_user_id"
ON "oxybeles_pasteditem" ("user_id");
COMMIT;

Finally, I updated the database structure:

$ python manage.py syncdb

To test this model, I defined an administrative interface:

$ gedit apps/oxybeles/admin.py
from django.contrib import admin
from oxybeles.models import PastedItem

class PastedItemAdmin(admin.ModelAdmin):
    list_display = ('uuid', 'user', 'pasted_at',)
    fields = ('text', 'in_response_to', 'user',)

admin.site.register(PastedItem, PastedItemAdmin)

Starting the server again and browsing to http://127.0.0.1:8000/admin/oxybeles/pasteditem/, I was able to create a few pasted items to verify that all is working:

In the next step I will create the user interface to paste new items and to view stored items.

The source code is hosted on GitHub.

October 24, 2008

Exploring Pinax – Part 3

Filed under: Software Development — Fernando Correia @ 8:51 pm
Tags: ,

This is the third of a series of articles about my experience with the Pinax project. I am building a sample paste bin application named Oxybeles, of all things.

On the previous articles I installed Pinax and created a tab in the main menu for my new app. Now I want to create a basic view, but first I need to start a new Django app.

$ python manage.py startapp oxybeles

It seems that it would be appropriate to move it into the apps directory, so I did that:

$ mv oxybeles/ apps/

Here, I took a detour to create a GitHub repository to host this application, but I won’t record my git sessions on this series, because the focus is on Pinax and Django.

After exploring a bit how other Pinax application URLs are set up, I decided to start by copying the pattern used in the “about” application.

I started by creating a basic template:

$ mkdir templates/oxybeles
$ gedit templates/oxybeles/new.html

I created the new file templates/oxybeles/new.html with this content:

{% extends "site_base.html" %}

{% load i18n %}

{% block head_title %}{% trans "Paste Bin" %}{% endblock %}

{% block body %}
    {% blocktrans %}
        <p>This will be a form to post some text.</p>
    {% endblocktrans %}
{% endblock %}

Next, I created a new urls.py file inside the new app:

$ gedit apps/oxybeles/urls.py
from django.conf.urls.defaults import *
from django.views.generic.simple import direct_to_template

urlpatterns = patterns('',
    url(r'^$',
        direct_to_template,
        {"template": "oxybeles/new.html"},
        name="oxybeles_new"),
)

Then I added the new application to the main urls.py file:

$ gedit urls.py

Around line 56, inside the urlpatterns list declaration, I inserted:

(r'^pastebin/', include('oxybeles.urls')),

And finally, I changed the menu option to link to the new URL:

$ gedit templates/site_base.html

Changing:

<td class="tab rtab_pastebin"><div><a href="#">{% trans "Paste Bin" %}</a></div></td>

To:

<td class="tab rtab_pastebin"><div><a href="{% url oxybeles_new %}">{% trans "Paste Bin" %}</a></div></td>

Now the Paste Bin menu item links to http://127.0.0.1:8000/pastebin/ and that renders the oxybeles/new.html template that shows just:

This will be a form to post some text.

Good, the new app is linked to Pinax and the basic view is working. In the next article I’ll try to get a basic form working.

The application source code at this stage can be found in GitHub.

October 23, 2008

Exploring Pinax – Part 2

Filed under: Software Development — Fernando Correia @ 7:59 pm
Tags: ,

This is the second of a series of articles where I register what I learn about developing Web applications with Pinax.

In the first part I got the sample website running. Now I’m going to add a section for a new application.

I will develop a simple paste bin where people will be able to store small ammounts of text and send it to other people. I will try to write it as a reusable Django application and leverage Pinax’s features.

I will call this application Oxybeles: an implement for throwing things, because when you paste something online you usually want to “throw” it to someone. Besides, a Greek name fits a Pinax app.

Creating a new tab

The first thing I wanted to do was to create a new tab in the site interface for the paste bin app. After searching a little I found out that the website tabs are defined in templates/site_base.html and that the actual text is stored in localizable resource files such as locale/en/LC_MESSAGES/django.po.

So I edited templates/site_base.html and inside the {% block right_tab %} section I inserted this line, among the others:

<td class="tab rtab_pastebin"><div><a href="#">{% trans "Paste Bin" %}</a></div></td>

After that I thought I should edit locale/en/LC_MESSAGES/django.po. But it seemed autogenerated, so I went to learn how that works. Django’s documentation is great. I quickly found out that internationalization is very easy and automatic in Django. While I’m developing I can just use the English text. If I want to update the translation files I can use this command at the project’s root dir:

$ python manage.py makemessages -l en

The first time, I got a message complaining that xgettext was not found. I corrected that by installing gettext:

$ sudo aptitude install gettext

After that, I generated the makemessages command again and I could see that locale/en/LC_MESSAGES/django.po was updated. I learned that I should also compile those files. But I reckon I’d only need to do that before a release, not during development.

So, with only a single new line in a template, I got the Paste Bin tab:

In the next step I will develop a basic view for this tab and maybe start the model object.

Your feedback is welcome.

October 22, 2008

Exploring Pinax – Part 1

Filed under: Software Development — Fernando Correia @ 8:13 pm
Tags: ,

What this is about

After learning how to build a Flex client and a Python server running on Google App Engine, I decided to try a pure-Web, pure-Python alternative. I chose Django, a first-class Web framework. I went through the tutorial and read the excellent book Practical Django Projects. The next step is building a website with some applications.

Fortunately, I found out about the Pinax project. It builds a website framework over Django and provides patterns for interoperable applications. I decided to learn how to leverage it so I can learn best practices and use some of its nice features like notifications.

I will do my learning in the open, as I did before, sharing my path and my discoveries. This is a journey from the eyes of a n00b that knows very little about Python, Django and Pinax.

I found out that this process helps me focus and structure my self-learning. I hope it may be useful to someone that follows the same path. And maybe someone more knowledgeable will correct one or two of the bloopers I make.

Installing Pinax

I started in a development environment that was already configured to run Django applications and had its fair share of tools, like a Subversion client and sendmail. You will have to refer to basic Django and Python material if you need to learn how to get to this point. Also, all my work is being done on Ubuntu 8.10, so you may need to adjust some commands if you use other environment.

Making a directory for Pinax:

$ mkdir ~/opt/django -p
$ cd ~/opt/django

Downloading Pinax and associated applications and libraries:

$ svn checkout http://svn.pinaxproject.com/pinax/trunk/ pinax

I am using version 0.5.0rc1. Things might be different if you use a newer version.

Creating a sample project

Edit: I changed these instructions twice, first to reflect best practices, thanks to a tip by Bob Haugen and later when Pinax was updated to require only changes in settings.py and not in manage.py.

Pinax comes with a sample project that can be used directly, but I will create an independent clone that I can change at will without getting in trouble with repository updates later.

$ cd pinax/projects/
$ svn export complete_project/ ~/Projects/exploring_pinax

Now we must edit settings.py to reflect the directory where we installed Pinax:

$ cd ~/Projects/exploring_pinax
$ vi settings.py

Change PINAX_ROOT to the main Pinax directory. For instance:

...
PINAX_ROOT = '/home/fernando/opt/django/pinax'
...

Also set ROOT_URLCONF using the name of the directory you exported the website project to:

...
ROOT_URLCONF = 'exploring_pinax.urls'
...

After that, save settings.py.

If we want, we can also create a file for future local settings like database passwords. I won’t use it now, but it may be handy to have it already created:

$ touch local_settings.py

Now create the local sqlite3 database:

$ python manage.py syncdb

When asked, create a superuser (admin).

Starting the website

$ python manage.py runserver

Open http://127.0.0.1:8000/ in your browser. You should have a Pinax website running. Congratulations! Login with your superuser and explore at leisure.

If you want to follow this series, browse https://fernandoacorreia.wordpress.com/tag/pinax/ for more articles or subscribe to my feed.

Your feedback is most welcome.

Blog at WordPress.com.